
DEVOPS FUNDAMENTALS
Introduction
In Part 1 of this tutorial, we covered the deployment details for WordPress pods, including the necessary deployment files and infrastructure required to deploy a WordPress application on a Kubernetes cluster.
In Part 2, we’ll proceed with deploying all the files and testing the WordPress application using a web browser.
PART 2
Step 1: On the Master node
1. Log in as the “jenkins” user on the Master Node:
$ cd ~2. Create a directory for WordPress configuration files (you can choose any name):
$ mkdir wp-config-files3. Mount the EFS (Elastic File System) created for config files: Replace
fs-011a40c8f24e5b94d.efs.ap-south-1.amazonaws.comwith your actual EFS endpoint.$ sudo mount -t nfs4 -o nfsvers=4.1,rsize=1048576,wsize=1048576,hard,timeo=600,retrans=2,noresvport fs-011a40c8f24e5b94d.efs.ap-south-1.amazonaws.com:/ /home/jenkins/wp-config-files4. Verify that the mount was successful:
$ df -k5. Navigate to the wp-config-files directory:
$ cd wp-config-files6. Install Git: (if not already installed)
$ sudo yum install -y git7. Download the required YAML files for deploying WordPress:
$ git clone https://github.com/AvangelsTech/simple-wordpress-files.git .
Next proceed to set up the Worker node for WordPress data files.
Step 2: On the Worker node
1. Log in to the Worker Node as the “jenkins” user:
$ cd ~2. Create a directory for WordPress data files (you can choose any name):
$ mkdir wp-data-files3. Mount the EFS (Elastic File System) created for the WordPress data files: Replace
fs-09b70377fe373b9f6.efs.ap-south-1.amazonaws.comwith your actual EFS endpoint.$ sudo mount -t nfs4 -o nfsvers=4.1,rsize=1048576,wsize=1048576,hard,timeo=600,retrans=2,noresvport fs-09b70377fe373b9f6.efs.ap-south-1.amazonaws.com:/ /home/jenkins/wp-data-files4. Verify that the mount was successful:
$ df -k5. Create two additional directories: “html” and “mysql”:
$ cd /home/jenkins/wp-data-files
$ mkdir html mysql
6. Set ownership for the directories:
$ sudo su
# chown jenkins:jenkins html
# chown jenkins:jenkins mysql
# exit
$ exit
The directory setup on both the Master node and Worker node is now complete.
Step 3: On the Master node
1. Log in to the Master Node as the “jenkins” user:
$ cd ~/wp-config-files2. Navigate back to the home directory:
$ cd ~3. Deploy the WordPress and MySQL pods, creating the necessary services:
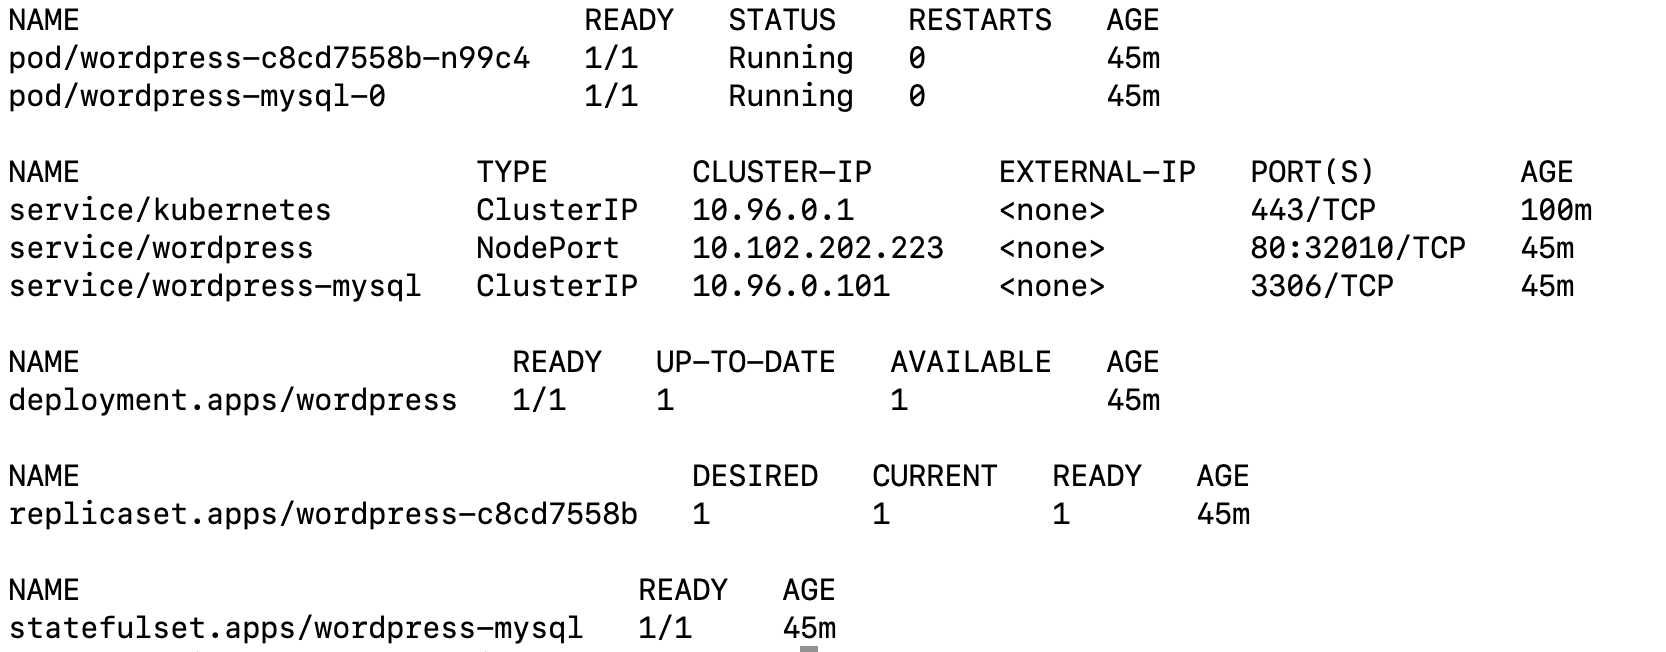
$ kubectl create -f wp-config-files/
This command deploys the WordPress and MySQL pods, creating the necessary services. You should observe an output similar to the following:
Step 4: Accessing WordPress
Retrieve the public IP address of the Worker Node from the EC2 console. In the service YAML file, we’ve specified 32010 as the nodePort for the WordPress service. Open any web browser and enter the Worker Node’s public IP address followed by port 32010:
Example: http://13.235.23.116:32010/
This will allow you to access WordPress. Keep in mind that you might encounter a ‘Database Connection Error’ in the browser.
How to remove the Database Connection Error
On the Master Node, you need to log in to the MySQL pod and create a new database. The database is not created by default. We will create a database called “wordpress” by logging into the MySQL pod.
1. Log in to the MySQL pod on the Master Node:
$ kubectl exec -ti wordpress-mysql-0 /bin/bash2. Access the MySQL prompt:
# mysql -u root -pYou’ll be prompted to enter the password.
3. Create a new database named “wordpress”:
mysql> create database wordpress;4. Exit the MySQL prompt:
mysql> exit5. Exit the pod:
bash-4.2# exit6. Finally, stop the WordPress deployment. To to that, delete the deployment (e.g.,
wp-config-files) to apply changes to WordPress data files.
$ kubectl delete -f wp-config-files/
Step 5: On the worker node
1. Log in to the Worker Node as the “jenkins” user. This is where the WordPress and MySQL data files reside.
2. Edit the “wp-config.php” file. This file contains essential configurations for WordPress. Make sure to keep it secure.
3. Modify the following parameters in “wp-config.php” based on your Kubernetes deployment YAML file:
- DB_NAME: The name of the WordPress database (e.g., “wordpress”).
- DB_USER: The database username (e.g., “root”).
- DB_PASSWORD: The database user’s password (e.g., “admin”).
4. Ensure that the WORDPRESS_DB_PASSWORD matches the password provided in the “secret.yaml” file. Remember that the password in “secret.yaml” is encoded in base64.
Step 6: On the Master Node
1. Log in as the “jenkins” user and navigate to the directory containing your deployment YAML files (e.g., “wp-config-file”).
2. Recreate the WordPress deployment using the following command:
$ kubectl create -f wp-config-file
This action will apply the database, database user, and database password values defined in Step 5 to the “wp-config.php” file.
3. Access WordPress via a web browser by pasting the public IP address of your Worker Node EC2 instance along with the port number:
http://<public-ip-address-worker-node>:32010
Replace <public-ip-address-worker-node> with the actual public IP of your EC2 instance.
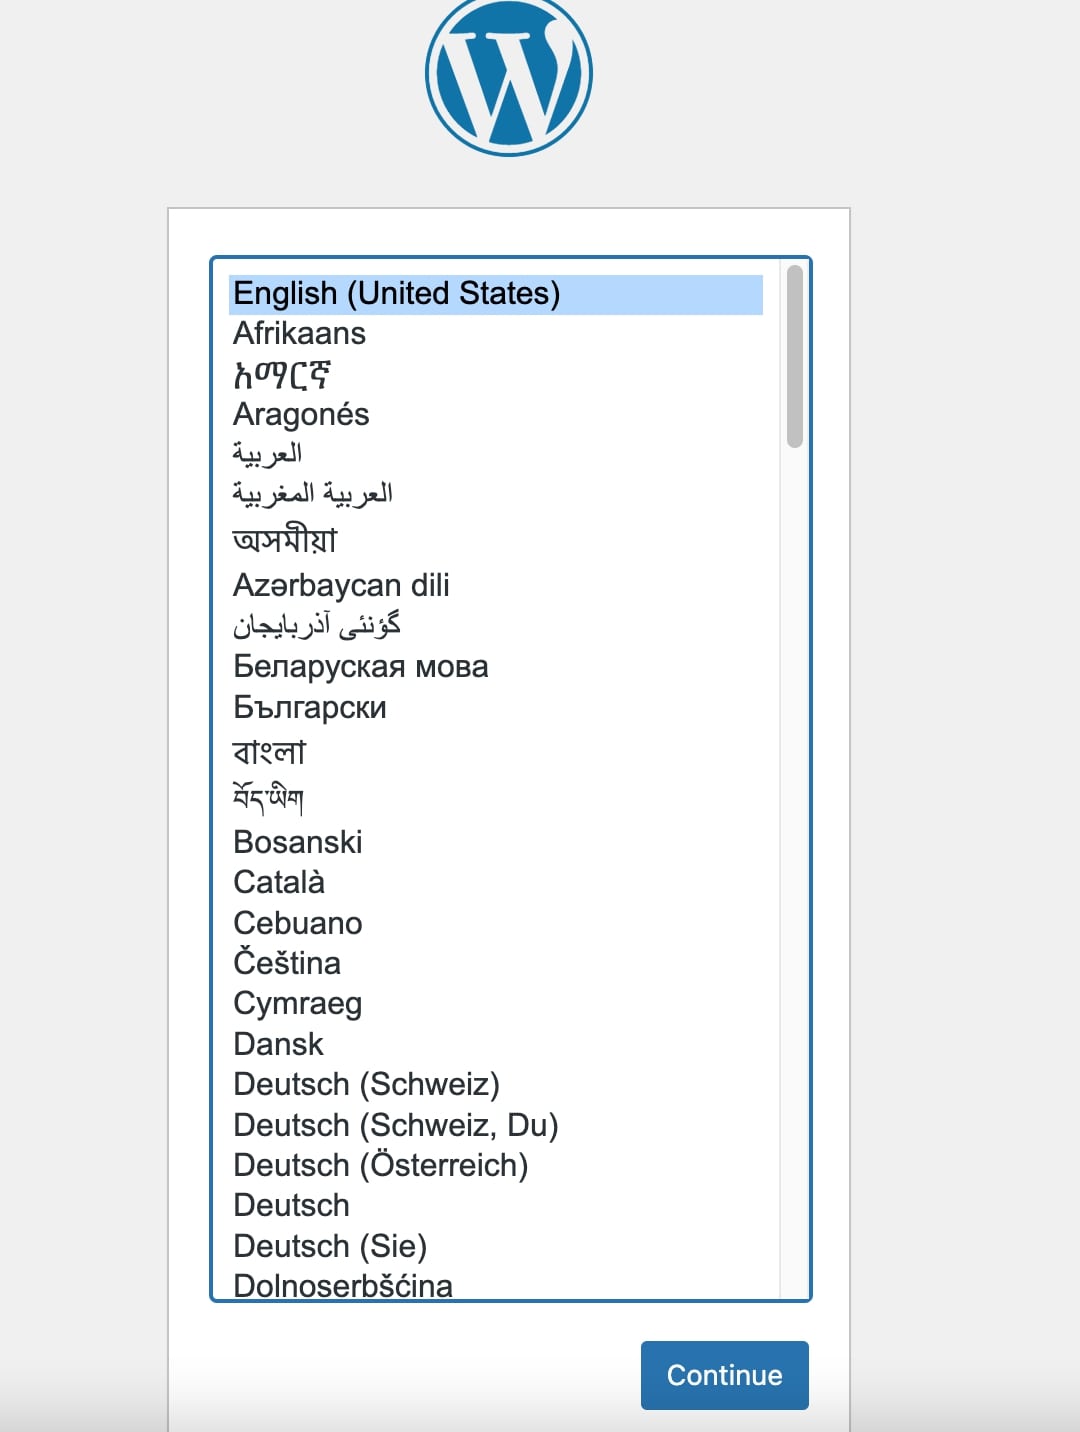
4. If everything is set up correctly, you’ll see the WordPress screens. Follow the prompts and input the necessary data (you can choose your preferred language).
English (United States) –> Continue
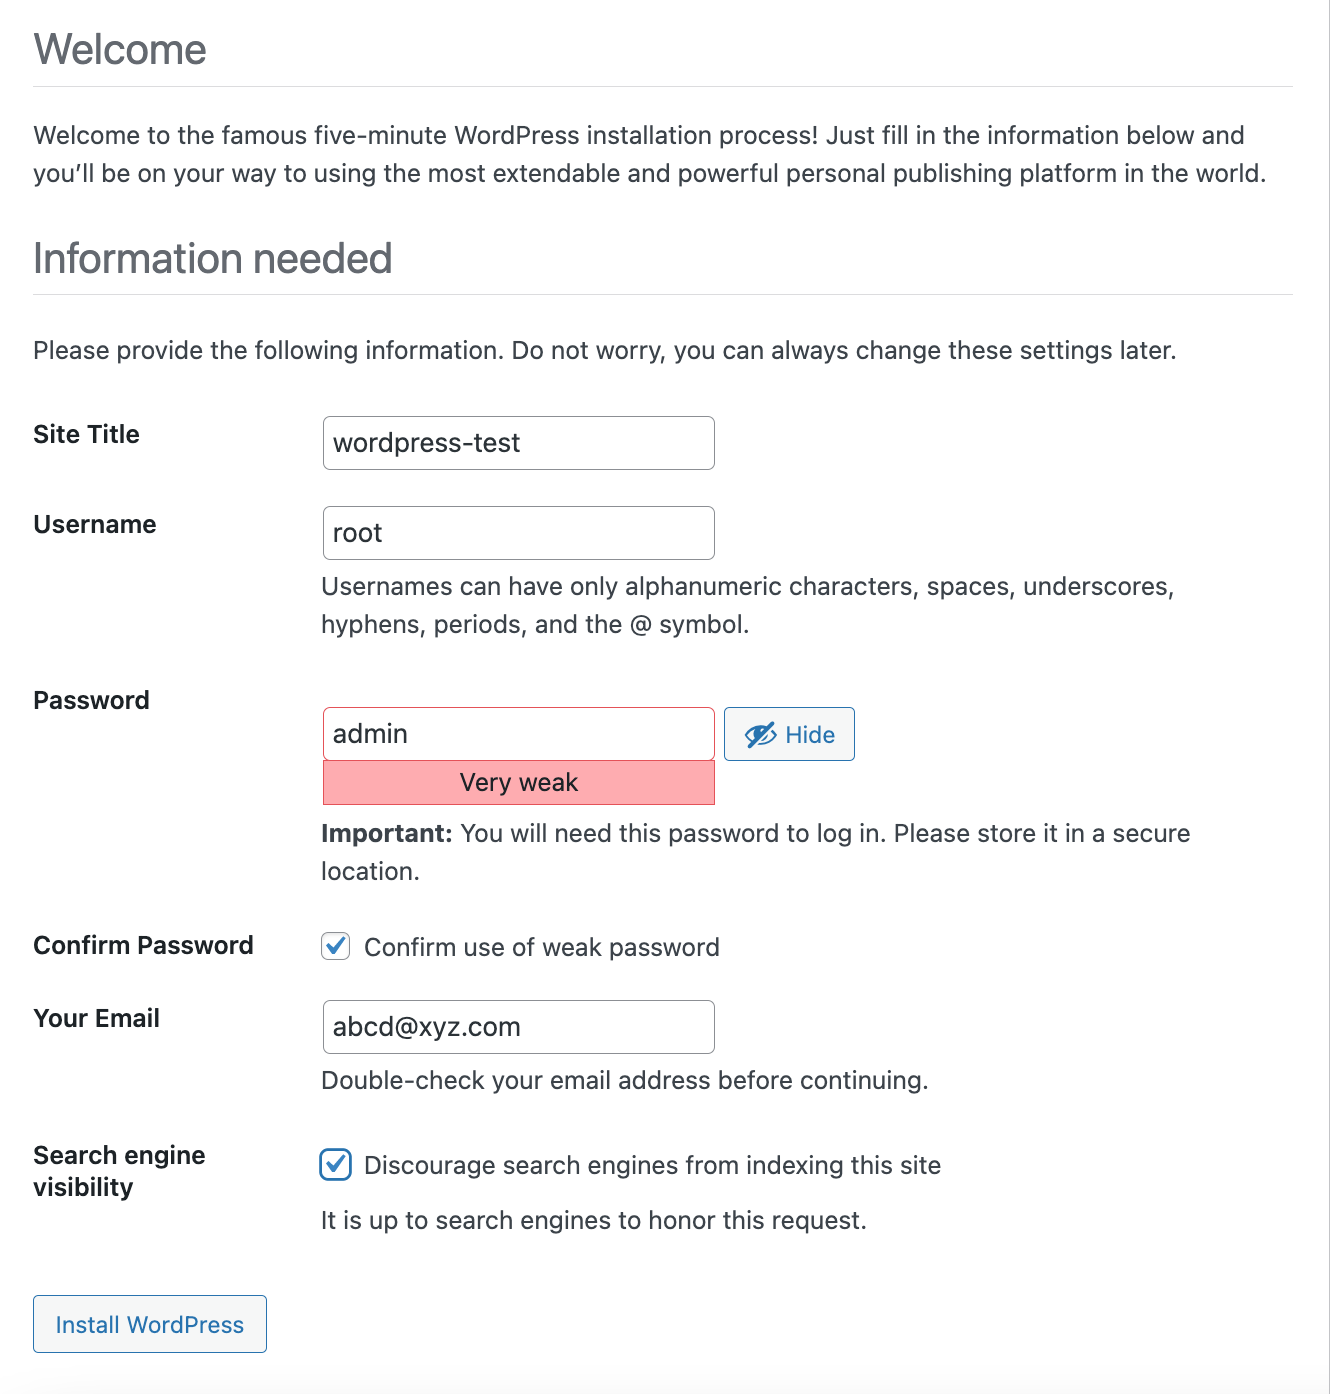
Enter the details. The below-entered values are just an illustration, so you can enter appropriate values. (Keep the password of root carefully)
If everything is OK, you should see the below screen.
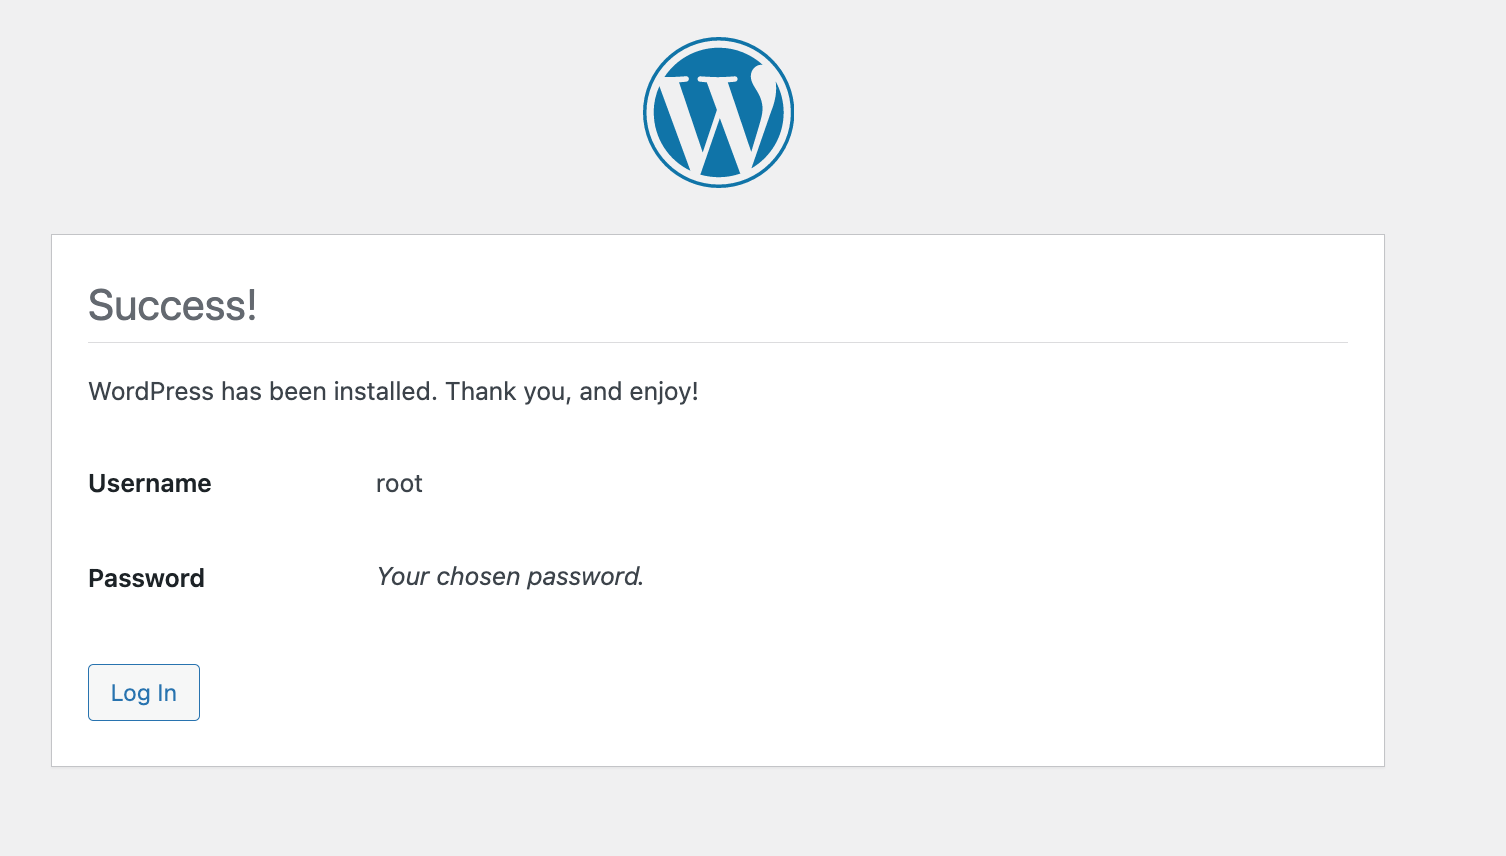
Click –> “Log in” to login to the WordPress Dashboard

CONGRATULATIONS you have successfully deployed a WordPress website on your Kubernetes cluster.
You can now build a website using this WordPress deployment.
Comments are closed.