KUBERNETES FUNDAMENTALS
Introduction
Welcome to Part 4 of our comprehensive 5-part tutorial series on deploying and managing a custom “remote-host” container for database backups. In this segment, we’ll focus on automating the backup process for the WordPress MySQL database using Jenkins, building upon the foundation laid in the previous three parts.
Objectives
1. Integrate the “remote-host” container with Jenkins
2. Develop a bash script to automate the backup process
3. Create a Jenkins job with cron scheduling for regular, automated backups
Prerequisites
Before proceeding, ensure that the following components are running on your Kubernetes cluster:
Why Automation?
While we successfully performed a manual backup in Part 3, real-world deployments require a more hands-off approach.
Automation ensures:
- Consistency in backup procedures
- Reduced risk of human error
- Efficient use of resources
- Adherence to backup schedules
What We’ll Achieve
By the end of this tutorial, you will have a fully automated system where:
1. Jenkins triggers the backup process at predetermined intervals.
2. The “remote-host” container executes the backup of the WordPress MySQL database.
3. Backup files are stored securely and systematically.
This automation not only saves time but also provides peace of mind, knowing that your critical data is being backed up regularly without manual intervention.
Let’s begin by integrating our “remote-host” container with Jenkins and setting up the necessary scripts and jobs for this automated backup solution.
Part 4
Automating MySQL Backups with Jenkins Integration
Step 1: Installing the SSH Plugin in Jenkins
To integrate the “remote-host” pod with Jenkins, follow these steps:
1. Log in to the Jenkins Dashboard:
- Access the Jenkins dashboard.
- If you’re unsure how to log in, refer to the relevant documentation.
2. Install the SSH Plugin:
- Navigate to “Manage Jenkins” > “Plugin Manager.”
- In the “Available” plugins section, search for “SSH.”
- Select the “SSH” plugin (version 2.6.1 or the latest version).
- Install the plugin without requiring a restart.
3. Restart Jenkins:
- After installation, restart Jenkins. This action will restart the Jenkins container.
- Once Jenkins is back up, verify that the SSH plugin is displayed under “Installed plugins.”
You’re now ready to proceed with integrating the “remote-host” pod and automating the backup process.
Step 2: Integrating the “Remote-Host” Pod with Jenkins
To seamlessly integrate the “remote-host” pod with Jenkins, follow these steps:
1. Configure Jenkins Credentials:
- Log in to the Jenkins dashboard.
- Navigate to “Manage Jenkins” > “Manage Credentials” > “System.”
- Under “Global credentials (unrestricted),” click “Add Credentials.”
- Choose the “SSH Username with private key” option.
- Provide the following details:
- Username:
remote_user- Private Key: Enter the private key generated using the
ssh-keygencommand for the remote user (as done in Part 1).- Click “Create.”
2. Configure the SSH Host:
- Before configuring the SSH host, set up CSRF Protection in Jenkins:
- Go to “Manage Jenkins” > “Security” > “CSRF Protection.”
- Enable “Enable proxy compatibility” (select this option) and save the settings.
- Now configure the SSH host:
- Navigate to “Manage Jenkins” > “Configure System.”
- Under “SSH remote hosts,” provide the following details:
- Hostname: The ClusterIP of the “remote-host” pod (e.g.,
10.97.129.185).- Port:
22(SSH port).- Credentials: Select the “remote_user” credentials created earlier.
- Click “Check Connection” to verify successful connectivity.
- Save your configuration.
Important: CSRF protection uses a token (called crumb in Jenkins) that is created by Jenkins and sent to the user. Any form submissions or similar actions resulting in modifications, like triggering builds or changing configuration, require that the crumb be provided.
3. Obtain the ClusterIP of the “Remote-Host” Pod:
- Run the following command on the master node to get the ClusterIP:
$ kubectl get all -n remote-host
- You should see output similar to this:
NAME           READY   STATUS    RESTARTS   AGE
pod/remote-host   1/1     Running   0          21h

NAME                  TYPE        CLUSTER-IP      EXTERNAL-IP   PORT(S)   AGE
service/remote-host   ClusterIP   10.97.129.185   <none>        22/TCP    21h
You’re now ready to proceed with the integration.
Step 3: Storing Sensitive Passwords Securely in Jenkins
To create automatic backup jobs, we provide information on all other parameters in the Jenkins job. However, certain sensitive credentials—such as AWS_ACCESS_ID, AWS_SECRET_KEY, and DATABASE_PASSWORD—should not be directly included in the script or exposed in the Jenkins job configuration.
Jenkins offers mechanisms to securely store these secret credentials within the system, allowing them to be used as needed without compromising security.
Follow these steps:
1. Create Secret Keys for Sensitive Credentials:
- Log in to the Jenkins dashboard.
- Navigate to “Manage Jenkins” > “Manage Credentials” > “System.”
- Under “Global credentials,” click “Add credentials.”
- Choose the “Secret Text” option.
- Provide the following details:
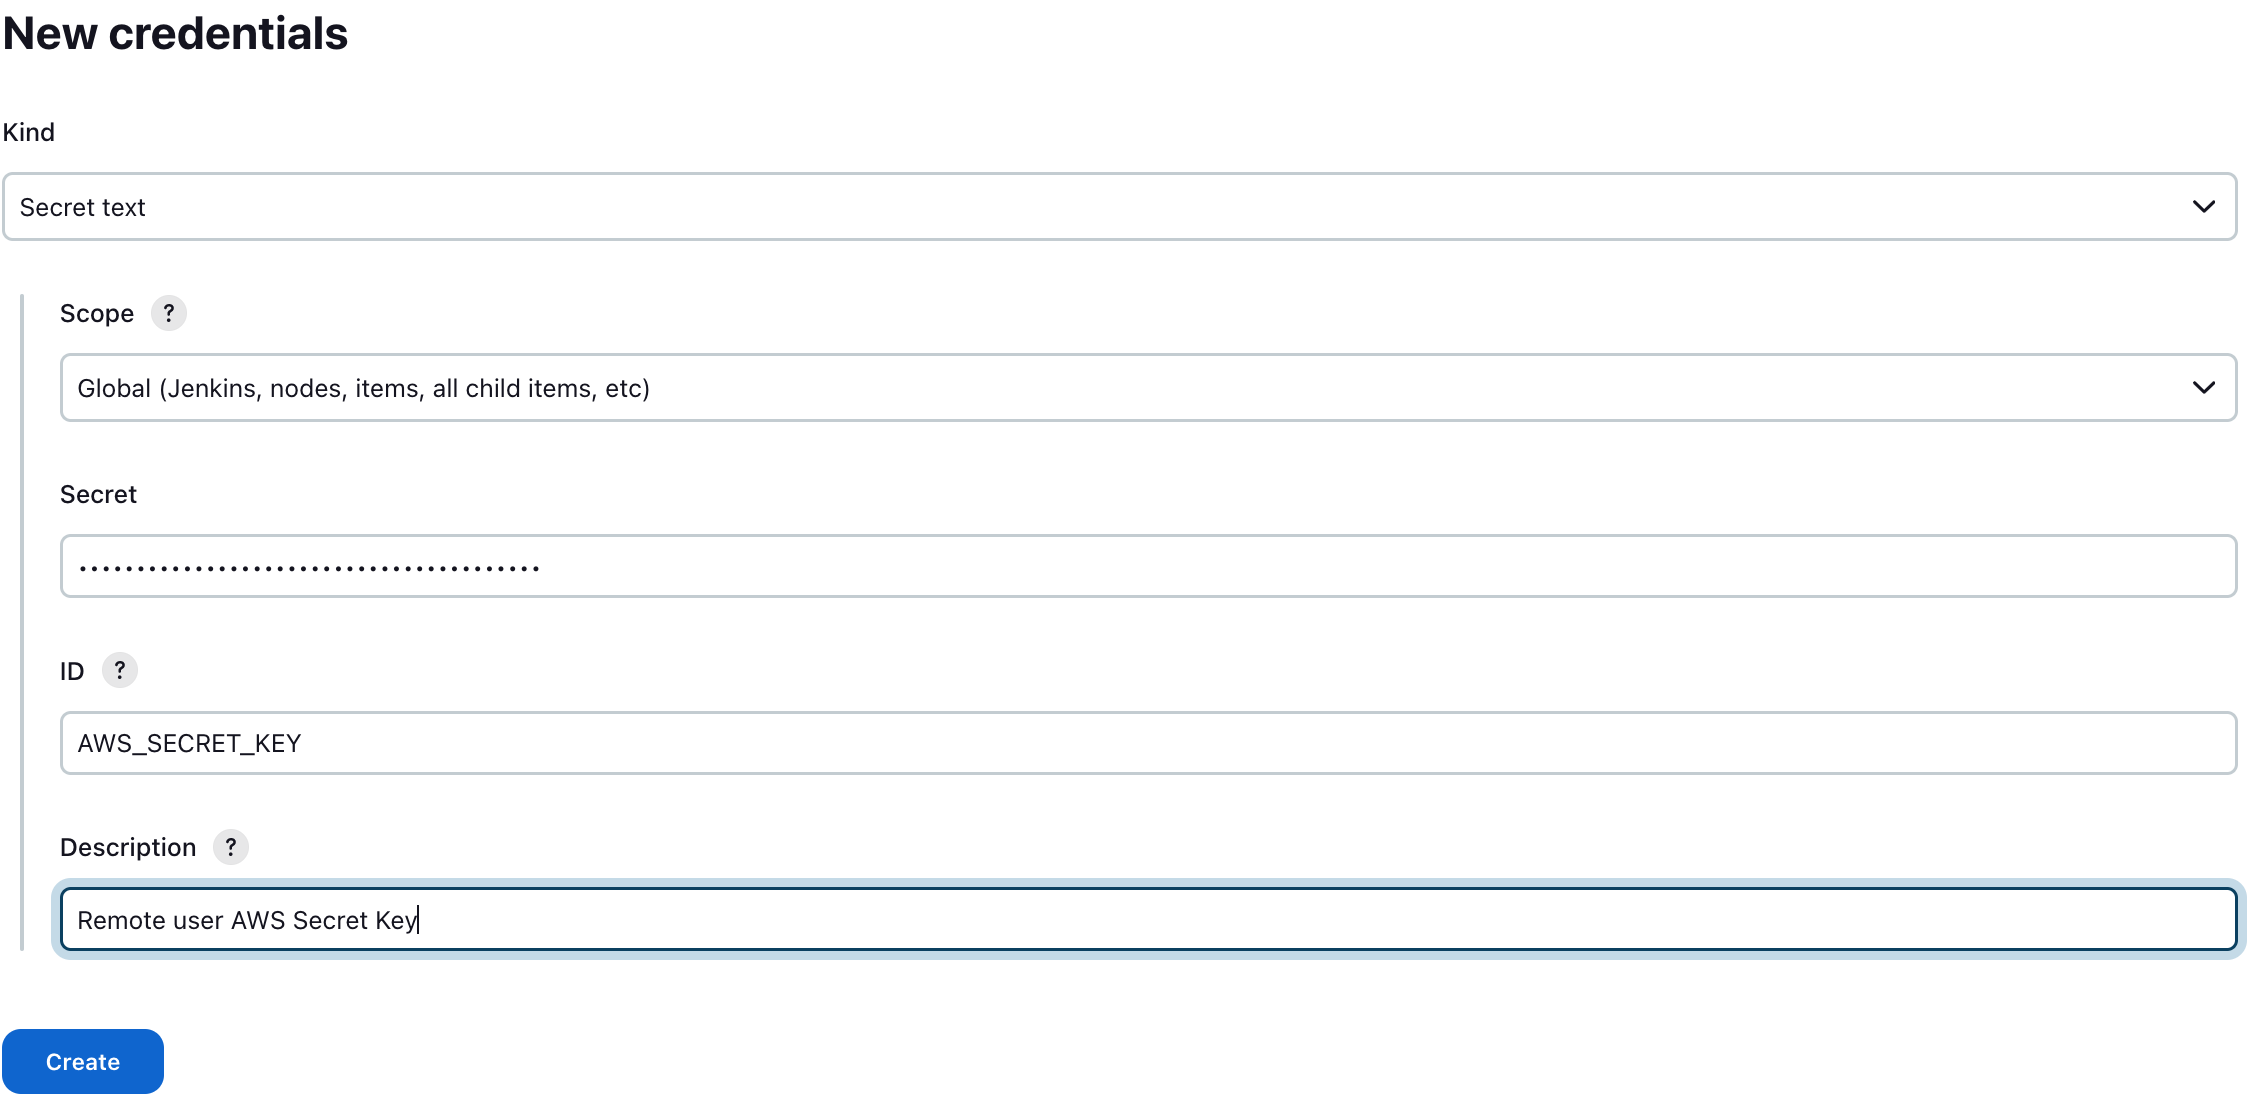
- ID: “AWS_SECRET_KEY”
- Secret: Enter the “Secret access key” from the Excel sheet (downloaded when the “remote_user” was created).
- Description: “Remote user AWS Secret Key”
- Click “Create.”
You’re now ready to securely manage your sensitive credentials in Jenkins.
Below is a screenshot of AWS_SECRET_KEY:
2. Create AWS_ACCESS_ID Credentials in Jenkins
- Log in to the Jenkins Dashboard.
- Navigate to “Manage Jenkins” > “Manage Credentials” > “System.”
- Under “Global credentials,” click “Add credentials.”
- Choose the “Secret Text” option.
- Provide the following details:
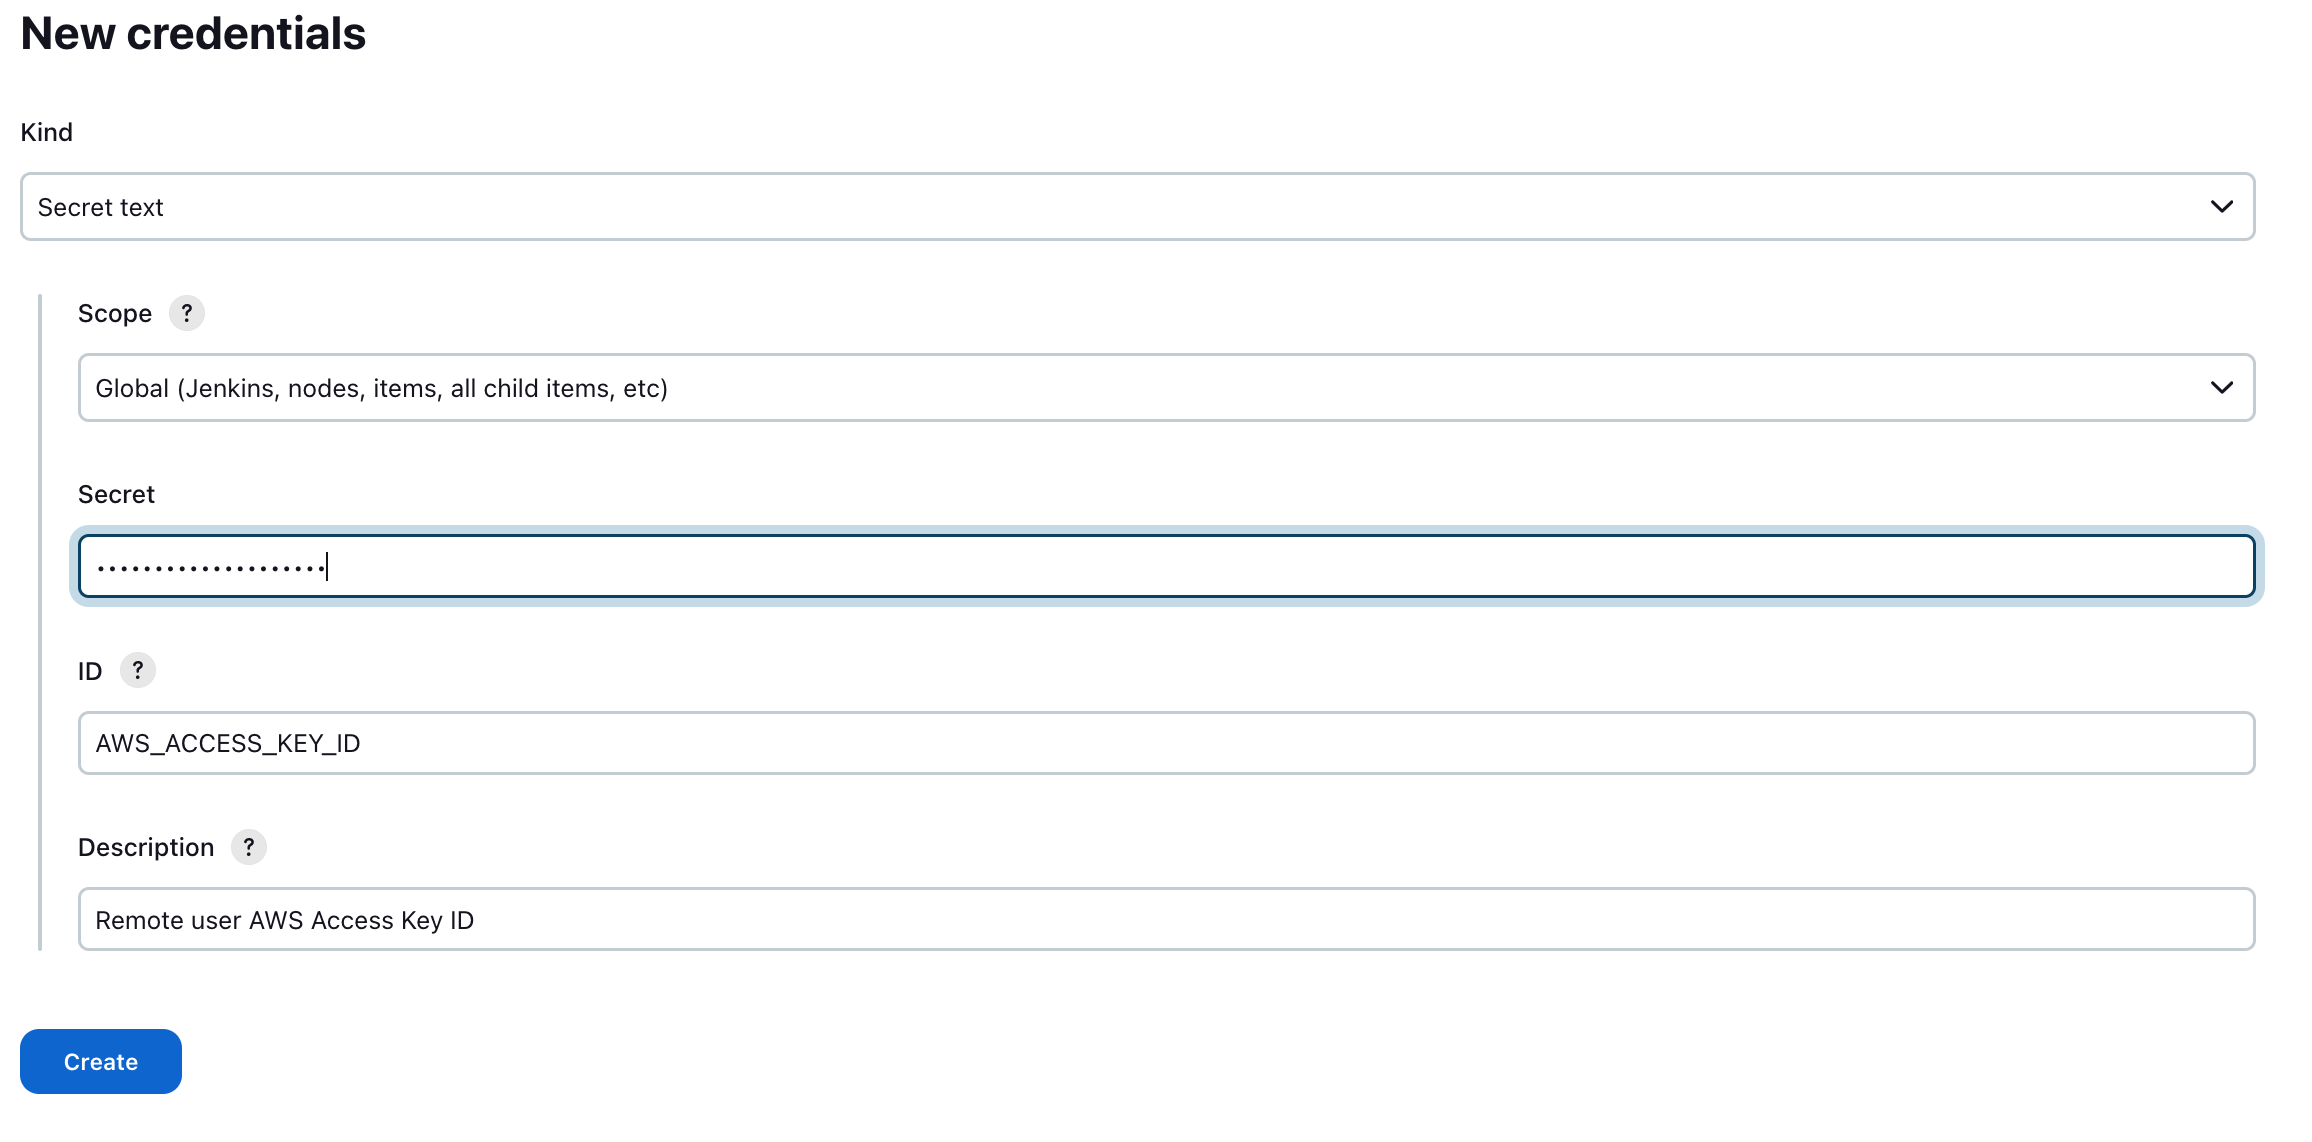
- ID: “AWS_ACCESS_KEY_ID”
- Secret: Enter the “Access key ID” from the Excel sheet (downloaded when the “remote_user” was created).
- Description: “Remote user AWS Access Key ID”
- Click “Create.”
You’ve securely added the AWS_ACCESS_ID credentials in Jenkins.
Below is a screenshot of AWS_ACCESS_KEY_ID:
3. Create WordPress MySQL Password Credentials in Jenkins
- Log in to the Jenkins Dashboard.
- Navigate to “Manage Jenkins” > “Manage Credentials” > “System.”
- Under “Global credentials,” click “Add credentials.”
- Choose the “Secret Text” option.
- Provide the following details:
- ID: “WP_MYSQL_PASSWD”
- Secret: Enter the WordPress MySQL password.
- Description: “WordPress MySQL Password”
- Click “Create.”
You’ve securely added the WordPress MySQL password credentials.
Below is a screenshot of the MySQL password screen.

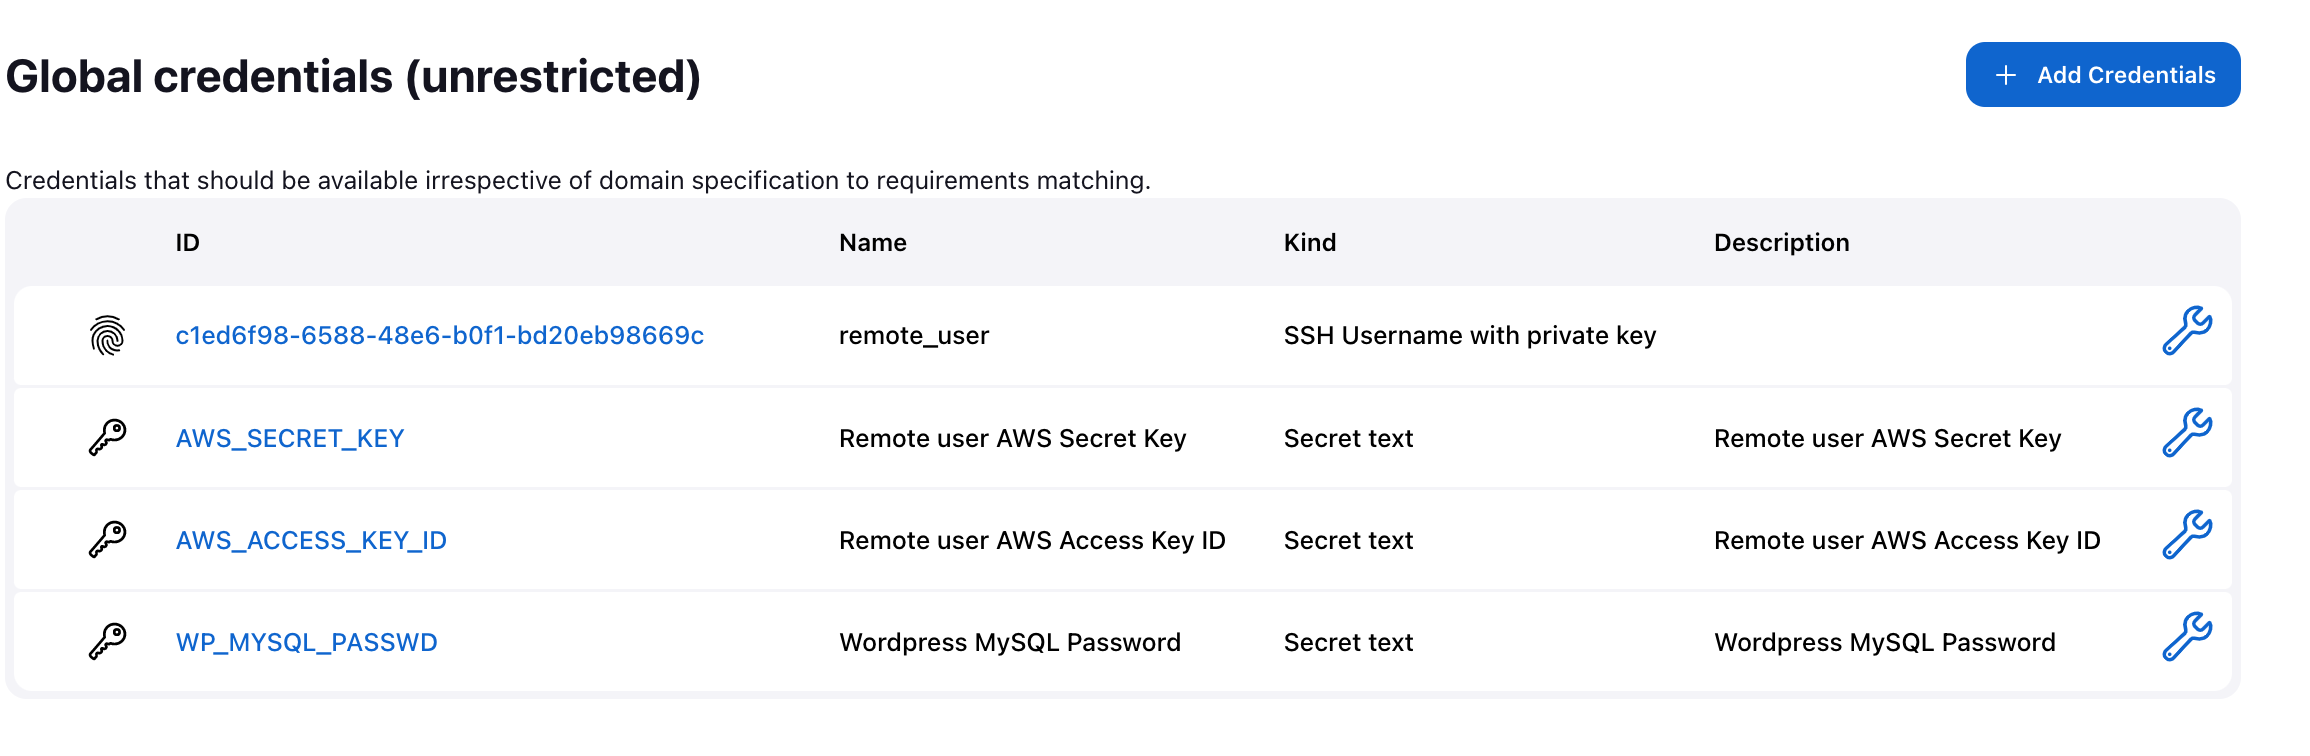
Storing Sensitive Credentials in Jenkins
In the previous steps, we securely stored the credentials for the user “remote_user,” including the AWS secret key, Access key ID, and the WordPress MySQL password. These credentials are sensitive and should never be directly exposed in any script.
By leveraging Jenkins’s Global credentials feature, we can now define these credentials within our Bash script without compromising security. This approach ensures that the credentials remain confidential and protected.
The Global credentials should look like below:
Step 4: Creating an Automated Backup Script and Configuring the “Remote-Host” Pod
Let’s create a shell script to automate the process of taking backups. You can create this script on your laptop or desktop. We’ve named it “my-wp-db-backup-s3.sh,” but feel free to choose any name you prefer.
#!/bin/bash

DB_HOST=$1
PASSWD=$2
DB_NAME=$3
AWS_ACCESS_ID=$4
AWS_SECRET=$5
AWS_DIR=$6

DATE=$(date +%d%m%y-%H%M%S)
BACKUP=my-db-backup-$DATE.sql

mysqldump -u root -h $DB_HOST -p$PASSWD $DB_NAME > /tmp/$BACKUP && \
export AWS_ACCESS_KEY_ID=$AWS_ACCESS_ID && \
export AWS_SECRET_ACCESS_KEY=$AWS_SECRET && \
export AWS_DEFAULT_REGION=ap-south-1

echo "Uploading ..."

aws s3 mv /tmp/$BACKUP s3://$AWS_DIR/$BACKUP
Important Notes:
This script must be stored and run from the “/tmp” directory of the “remote-host” pod.
If the “remote-host” stops and restarts, the “my-wp-db-backup-s3.sh” script won’t be present in the “/tmp” directory. In such cases, you’ll need to manually copy the script again.
To automate the backup environment, we’ll permanently mount the “my-wp-db-backup-s3.sh” script on the “remote-host” pod.
In Part 5 of this tutorial, we’ll further automate the process by backing up the WordPress MySQL database to an AWS S3 bucket.
Part 5
Comments are closed.